Checking if the washing machine is done is a popular (not to mention useful) application. This is often done by sticking LDRs to the washing machine, adding IMU sensors or analyzing mains power usage or even the sound emitted.
I needed a solution with minimal time effort as I have lots of other things I want to do so I went with a Raspberry Pi Zero W and a PiCamera. Starting as “wash monitor” it transformed to “appliance monitor” as any appliance can be monitored. I have a single Raspberry Pi keeping an eye on both the washing machine and the tumble dryer.
The idea is simple, take a picture, process and count pixels:
- All black: lights are off and the machine is off
- Most black: lights are off and the machine is on
- Few black: lights are on, machine state is unknown
Next, the “lights” and “machine” states are tracked and a notification is sent when “machine” goes from “on” to “off”. Pushover is used as notification service and MQTT for general service monitoring.
There are a few prerequisites that make this solution actually work (yes I know you objected to the idea):
- My washing machine is in the basement, ie. in a “controlled light environment”.
- The lights in the laundry room are Ikea Trådfri ones activated by a motion sensor and they switch off after a few minutes meaning we will never be stuck in the “lights are on, machine state unknown” state.
- Normally no-one enters the laundry room minimising the risk of false positives by a person dressed in black pants standing in front of the camera.
The system works great for me but might be completely useless to you 😀
MJPEG Streamer is used for snapping pictures and ImageMagick for processing. Pictures are cropped to only reveal the display which increases the percentage of non black pixels when the machine is on. Blurring is used to increase specular highlight of the LEDs, a threshold filter is applied making sure we end up with only black and white pixels (and no image sensor noise) and finally the histogram is calculated. The Pi is taped to the wall opposite the machines so it will not move (which would mess up the cropping).
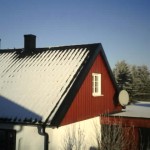
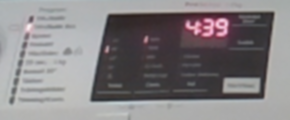
Here is an unprocessed cropped picture of the washing machine display when the room is lit:
(Applying blur and threshold filters now yields a completely white picture from which we can only determine the lights are on)
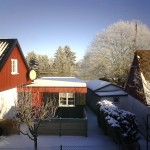
The same picture with the lights off:

Blur and threshold filters applied:

Lights off, machine off, blur and threshold filters applied:

Installing and configuring
First clone this the Appliance Monitor repo:
git clone https://github.com/kanflo/appliancemon
You need ImageMagick, Python Requests and Paho MQTT and MJPG Streamer (and of course lots of stuff to be able to build):
sudo apt-get install imagemagick
sudo apt-get install python3-pip
sudo pip3 install paho-mqtt requests
sudo apt-get install build-essential git libjpeg8-dev imagemagick libv4l-dev cmake
git clone https://github.com/jacksonliam/mjpg-streamer.git
cd mjpg-streamer/mjpg-streamer-experimental
make && sudo make install
To spare the poor MicroSD card I use a RAM disk for image processing and a script is provided that adds the RAM disk to /etc/fstab:
sudo ./create-ramdisk.sh
Next, copy sampleconfig.yml and modify as needed (there are lots of comments to guide you). The “image processing parameters” section can be skipped for now.
A start script for MJPG Streamer is included where parameters such as white balance can be set:
sudo /home/pi/appliancemon/mjpg-streamer.sh start
If this fails, check the bcm2835 Video4Linux driver module is loaded and then try to start MJPG Streamer again:
sudo modprobe bcm2835-v4l2
To make it load on boot:
sudo echo "bcm2835-v4l2" >> /etc/modules
Snap a picture:
curl -so image.jpg "http://wash.local:8080/?action=snapshot.png"
Use this image to determine the crop area specified in ImageMagick style (blur and threshold are also IM style, check the ImageMagick documentation for help).
Now try the cropping and calculate the black level. The last two zeroes are “blur” and “threshold” (zero means disable).
./applimon.py -c washconfig.yml -t "290x120+20+410 0 0" ; open image-proc-washer.png
Black level: 0%
Now turn on the machine, turn off the lights and apply blur and threshold:
./applimon.py -c washconfig.yml -t "290x120+20+410 0x6 6"
Black level: 94%
And finally turn the machine off:
./applimon.py -c washconfig.yml -t "290x120+20+410 0x6 6"
Black level: 100%
You may need to elaborate with the blur and threshold parameters to get satisfactory black levels. I use the ones in the sample config for both my washing machine and tumble dryer.
Finally add the following lines to crontab -e:
@reboot /home/pi/appliancemon/mjpg-streamer.sh start
@reboot /home/pi/appliancemon/applimon.py -c /home/pi/washconfig.yml &
@reboot /home/pi/appliancemon/applimon.py -c /home/pi/dryerconfig.yml &
Code on GitHub as always.