More news: read all about the new AAduino Zero.
News: the crowd sourcing campaign for the AAduino will start soon, sign up at CrowdSupply to be notified! The specs have been beefed with an STM32L0 cpu and the temperature sensor is now an industrial grade TMP102.
Update: you can now order the AAduino PCB from DirtyPCBs.com and get a Commadorable 64 bonus PCB for free.
I have been using Nathan Chantrell’s Tiny328 for quite some time as my swiss army knife ISM radio node. Now I wanted a more slim ISM node as my setup with a Tiny328 on a breadboard is not very “deployable”. I could of course 3D print a case for the Tiny328 but I have limited access to 3D printers and do not feel I have the time to explore that exciting part of the maker world just yet. This leaves me with finding off the shelf project boxes with a compartment for 2x AA batteries and the “radioduino” (and in an acceptable form factor). That search came up disappointingly, and surprisingly, short. I did have a set of standard eBay AA battery holders and looking at the 3x variant it occured to me. I needed to shrink the radio node, and the AAduino was born.
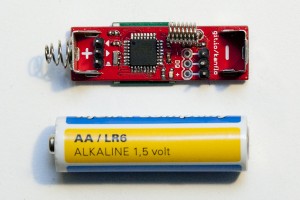
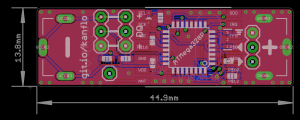
The AAduino is an wireless Arduino clone the size of an AA battery with Keystone battery terminals rotated 180° to act as positive and negative terminals. It is powered by an ATMega328p and is fitted with an RFM69C companion. There is room for two DS18B20 temperature sensors and an indicator LED.
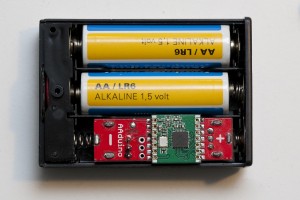
It runs at 8Mhz to allow for greater life span since the CPU can run at a lower voltage. I have fused the 328 to brown out at 1.7V which is a bit out of spec at 8Mhz and slightly below what the RFM69C needs. Running at 4Mhz would be more suitable but I will see how well the node performs when the batteries are draining out.
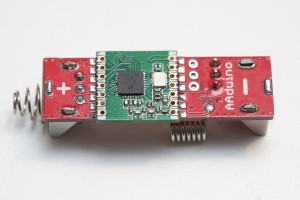
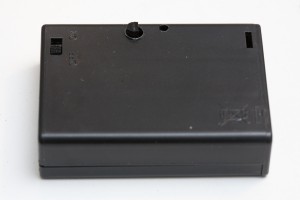
Since the RFM69C is somewhat wider than an AA battery I used a file to make it slightly narrower. There is some room for that kind of modification without damaging the module. Update, the RFM69C will fit without modification. Next I clipped the legs of the DS18B20 until about 5mm remained and soldered it to the 3x pin header on the AAduino. I then drilled a hole in the battery box where the sensor can protrude and a small hole for the LED to shine through. The wire out of the battery box was cut, shorted and stuffed away inside the box.
I use battery terminals from Keystone available from RS Components, positive and negative. There seems to be a cheap eBay alternative but I have not tested those. The + and – markings on the PCB indicates (this is important, read carefully) the positive and negative poles of the battery we are pretending the AAduino is. The Keystone spring contact should be soldered to the + marking and the button contact to the – marking. There is no protection diode here so be careful. Also note! If you want to power the AAduino from a bench power supply, connect the power supply’s black negative lead to the + marking and the red positive lead to the – marking.
The 3xAA boxes are also from eBay and there seem to be two different types. One that is really good and one that is really crappy. I will let you in on the secret of buying the correct one. The good ones have a nice build quality and plastics and look like this. Note the rectangular piece of plastic below the battery compartment extending from side to side.
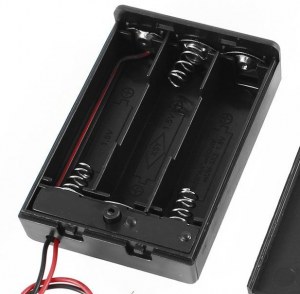
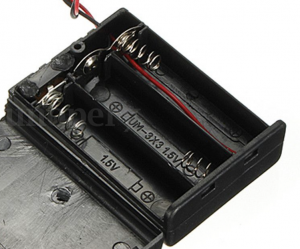
Looking at the crappy ones, well you can tell can’t you? In the top left corner it seems someone used a soldering iron on the poor thing. The lid does not snap in place very well and the plastics is really cheap.
Code, schematics and BOM on Github, as always.
What a brilliant idea!
Thanks! Oh, and thank you for the Tiny328 ?
+1 this is genius !!
Is it possible to buy this kind of stuff ??
Thanks! Not yet but I am about to look into it.
Nice 😉
It will be very easy with that kind of stuff to get temperature sensor in every room in the house
Yup. The extra DS18B20 interface is for monitoring eg a freezer using a wired ‘B20 (in addition to monitoring the room the freezer is located in)
I would buy some, too. I just ordered some boxes 2xAA for this Aaduino and a 3.7V LiIon cell…
In that case you would need a voltage regulator. The AAduino is designed to run from unregulated batteries and the RFM69 does not support 3.7V IIRC. OTOH you could get ~3yrs uptime with good AA batteries according to Nathan Chantrell.
I guess, that won’t be a problem… The RFM69 will work fine up to 3.6V… So I just need to use a diode, to have a bit lower voltage. Why I eanna use LiIon cell? The case will be 30% smaller and I can recharge…
Aha, thanks for pointing that out.
Pingback: The AAduino Is An Arduino In An AA Battery | Geek Casual
Pingback: AAduino - Arduino Wireless in AA form factor - Electronics-Lab
Pingback: AAduino Arduino Compatible Board Fits Neatly into an AA Battery Case
Brilliant, man! Just a superb idea!
Fantastic!
Pingback: Mad scientist shrinks Arduino to size of an AA battery | TechCrunch
Pingback: マッドサイエンティストがArduinoを単3電池サイズに詰め込んだ | TechCrunch Japan
Pingback: AAduino is an Arduino-compatible board the size of a AA battery | Atmel Bits & Pieces
nice! awesome idea!
Really nice work 🙂
great work !!
Pingback: 奇特的 Arduino 开发板:只有一节 5 号电池大小 | TechCrunch 中国
This is awesome!
Really cool project (and above my skill level, that’s for sure!).
As far as worrying about when your batteries run really low, have you considered adding a joule thief / battery vampire to your setup?
https://en.wikipedia.org/wiki/Joule_thief
Thanks! Joule thiefs are above my skill level but seem like an interesting addition.
I know you said you were a software guy rather than a hardware guy, but they’re pretty simple:
http://www.instructables.com/id/Make-a-Joule-Thief/
Replace the LED in the joule thief design with a simple diode and put an electrolytic capacitor (I’ve used 100uF with no problems) across + and – (after the diode) to get stable power.
And it’s not a 328, but I did a write-up about powering an ATTiny85 and NeoPixel with a joule thief — https://www.hackster.io/wgbartley/attiny-joule-thief-neopixel-30de67
Go ahead and start the kickstarter and I am in 🙂
Well that’s an interesting thought. Must look into that. Thanks!
I’m down to back a kickstarter or indigogo.
Sign me up, I want half a dozen or so, ASAP…
I agree, get this thing on kickstarter!
me too(tm). I’d love to build this, but I don’t want to scrounge for all the parts.
Also, I’d love to help organize the Kickstarter with you. I can handle “north american distribution” or whatever else you’d like.
I will see what I can do to make the AAduino available for purchase.
But firstly yuu have to solve CLK freq issue. 16 MHz is too much for such low voltage…
That’s correct. I use 8MHz which is still somewhat out of spec at lower levels but a lot better than 16MHz.
Having this thing working with regular AAs is of course very nice, and as I understand it, it does already.
But if the voltage-drop of regular Alkalines becomes a problem, there is the Energizer L91. Then you get operation down to -40degC as well.
http://www.candlepowerforums.com/vb/showthread.php?368072-Test-Review-of-Energizer-Ultimate-Lithium-AA
http://data.energizer.com/PDFs/l91.pdf
Set CLKDIV8 fuse and you’ll be on a safe side with both 8 MHz (1 MHz CLK) and 16 MHz (2 MHz CLK).
Thanks for the tip.
Brilliant! I’d buy 10! If you launch a Kickstarter, you already have my pledge! This has everything and more that I need for most of my projects. It’s no wonder I see you article everywhere!
Thanks!
Another vote for kickstarter
I am not clear on how this is powered by the two batteries it is in series with. do you short the two leads to complete the circuit?
That’s right. The leads sticking out of the battery holder are cut and shorted.
I think you might be a genius.. thats so simple.
*blushes*
Brilliant idea, well done!
This is absolutely amazing.
Congratulation man, that´s really a great idea.
Go ahead with the Kickstart
Johan, great talent!
Congratulations!
I have a couple of ideas that may require “some” validation. Is there any way to be in touch with you directly? Direct email or Twitter account will be great.
Thanks
Thanks! Check my GitHub page for contact info.
I shared this on Hacker News because it is just a very nice project. That’s why you might have had a little spike in traffic. 😉
Happy tinkering!
it was shared a couple times on reddit, probly why it went down for a while
😀
Pingback: AAduino es una placa Arduino tan pequeña como una pila | La 100 Las Varillas
This is a great idea, and reducing it all down to the size of an AA makes it so much more practical for size-limited tasks. Have you considered the 18650 form factor lithium battery? If the board were that size then you would be able to use it in a 2-cell box with a higher available voltage.
That idea crossed my mind also. Also makes it possible to add an NRF24L01+ with a widht of 17mm, and running the AVR on 3,3v thus 8mhz.
Oh goodness, the 18650 idea would be fabulous, especially because a single 18650 would be able to put out an excellent amount of power for a single cell.
Think if the board was designed to hold a single 18650 (as well as expose a Li-Ion charger / regulator). That would be quite useful for deploying remote sensors.
I am also looking forward to a kickstarter/indiegogo thing.
I am sure a version to go along with a single 18650 will have uses. But given the self-discharge rates of Li-ion (8%/month @21degC) vs Akaline (2-3%/year), a pair of good AAs will quite possibly result in longer uninterrupted runtime for a low-power remote sensor.
Also, a charger circuit will add to the cost. Not a function *most* users will utilize very often, I presume.
But padding the AA-sized AAduino so it sits snug in a dual 18650 box should be doable? And the padding could for example be made up of, say, a tiny microUSB-fed 18650 charger? I am just brainstorming here…
A joule thief sounds intriguing. But from my understanding of it, it has an oscillator, and hence it also *consumes* power. Not sure if the effect of a JT or any other voltage booster will result in actual longer runtime for the typical usecase. Can it be designed to only be in effect when the battery voltage sags below some threshold? I am not an electronics guy, so I have no clue. But there is no free lunch. Somebody do the math, please.
I am curious about how much a prebuilt AAduino may cost….
Good point regarding Li-Ion discharge rates… I think I might just want an excuse to use all of the 18650s I’ve harvested from old laptop batteries, so maybe I’m biased.
Lots of excellent ideas rolling around here in this thread. Hopefully we will see some of them come to fruition.
what about CR123?
The AAduino could very well run on a CR123. It would not last as long as on 2xAAs but would make an even tinier node.
Pingback: AAduino es una placa Arduino tan pequeña como una pila | PK Tech
Pingback: AAduino:一款可以伪装成电池的Arduino克隆板 - 来科技-来科技
Pingback: AAduino – AA battery size Arduino by Johan Kanflo | Do It Yourself India Magazine
Pingback: Dynamischer wischender Blinker A6 4f Facelift Seite 14 : Wenn ich es richtig im Kopf habe arbeitet ihr mit Arduino? Dan...
Pingback: Around the web: Episode #20 | GX Consultancy – Blog
Pingback: AArduino, la scheda Arduino grande quanto una pila stilo | maticciofive
Hej Johan! Great idea, and amazing to see your name pop up on all the tech blogs! 🙂
Tjenare! Thanks, this wasn’t really what I expected 😀
Pingback: Software engineer shrinks Arduino down to the size of a AA battery - eeDesignIt.com
C or D size might be easier to work with and will last longer over time. Plus rechargeables are cool too
Congratulations!!
Brilliant!
This is what I’ve been looking for for so long …
But, as I’m color-blind, rather a SW techie and have few experience with soldering: when and where can I buy it?
Also, how can I receive and work with the data on Raspberry Pi?
You would need some kind of gateway to receive the data on the 868MHz radio and feed it to the Pi that in turn posts the data to some kind of web service. There are some available radio gateways available. The Emoncms project have one called RFM12Pi that aka believe you can buy online. I build a similar one called BranlyPi for the purpose of learning PCB CAD and SMT mounting. As for the AAduino, I will look into the possibility of making it available for purchasing.
I assume it is compatible with Flutter, but I haven’t looked into protocol support.
Pingback: AAduino : a battery sized arduino - Ilovearduino
Very cool, AND with an ISM transceiver? Even cooler. I have begun tweeting! I’m a Product Manager and technology marketer. A colleague at the large company we work at introduced me to your site. Keep up the awesome creative work!
twiiter: joshdewinter
-Josh
Pingback: Scienziato pazzo restringe Arduino alle dimensioni di una batteria AA | Il Blog di Massimo Antonini
Pingback: AAduino es una placa Arduino tan pequeña como una pila | Linux en español
Pingback: AAduino: il piccolo clone grande come una pila! - Lffl.org
Pingback: Meet the Arduino Clone That's the Size of a AA Battery | Make: DIY Projects and Ideas for Makers
Pingback: Think Of The Things You Could Do With This AA-Sized Arduino Board | Gizmodo Australia
Hello,
what about using a 3.6V LiPo Cell in AA size?
Maybe I will get other boxes for bigger cells, so I can use 5AH LiPo cells…
Bye,
Tom
Pingback: A pilha em forma de Arduino: o AAduino - Experimentoria
Hej Johan,
Do you think the PCB board of a soil Hygrometer Detection Module would fit in the box?
http://smart-prototyping.com/Soil-Hygrometer-Detection-Module-Soil-Moisture-Sensor-For-Arduino.html
I have one of those and the PCB is too wide. Perhaps with a box for 5x AA if it exists.
I just came across this. Might be an interesting addition if you wanted to remotely turn a project on and off. Could probably automate to some extent, too.
http://www.amazon.com/gp/product/B00ICP1J3M/ref=s9_wish_gw_g23_i11_r?ie=UTF8&colid=2FLC8OQ7QILUH&coliid=I1UI3SWDGFVHGN&fpl=fresh&pf_rd_m=ATVPDKIKX0DER&pf_rd_s&pf_rd_r=1QHSHB2BXYTTNXN0RS99&pf_rd_t=36701&pf_rd_p=5d23eaf6-6278-49c1-b6df-7de0cb9b3a26&pf_rd_i=desktop
Pingback: Make: Japan | AAduino — 単三電池サイズのArduino互換ボード
Great work, Johan!
I also think you should kickstart/indiegogo it. Any idea about the cost?
Dear
Great project….
Is there a option that your hardware is going to work with mysensors?
What is the battery life of this sensor?
I plan to look into mysensors. The battery life should be around 3yrs with good batteries.
OSH is probably a great place to get boards done. Anyone have a suggestion for BOM?
http://docs.oshpark.com/design-tools/
I second this! I’d love to see this as a shared project on OSH Park so we can order the PCB’s.
Pingback: AAduino, the Arduino Clone That’s the Size of a AA Battery | Open Electronics
Combined with an 0.91″ OLED (128x32px, panel size 30×11.5 mm) would be the cherry on the top.
http://www.buydisplay.com/default/0-91-inch-128×32-oled-display-with-connector-fpc-ssd1306-white-on-black
http://www.buydisplay.com/download/manual/ER-OLED0.91-1_Series_Datasheet.pdf
Power consumption should be quite low: max 12/18mA with 50/100% pixels lit , sleep mode 2uA.
The 15pin FPC connector has the same with (13.15mm) as your PCB.
http://www.buydisplay.com/download/connector/ER-CON15HT-1.pdf
Johan, have you made any progress w.r.t. finding out if this can produced in any volume? Or would you rather someone else took the idea and ran with it? Asking with an open mind here…
Hi Dag. I actually began looking into this yesterday. Stay tuned.
What gateway do you use to have all of your sensors communicate back to a local base station?
I’ve been deploying some ESP8266 based wireless temperature sensors, but these are significantly more efficient….
Have you tested with Rechargeable AA batteries? (NiMh?)
I currently use my BranlyPi to receive data and a Python script to post it to Emoncms. I have not tried rechargeable batteries, I don’t know how they would match up to their non rechargeable counterparts.
Looking for the Kickstarter project!
Hi,
any news about a possible Kickstarter/Indiegogo campaign?
Thanks for taking interest. I am in discussion about this and should have something to announce soon.
No news yet, my time is currently a bit restrained I’m afraid.
I use a single LiFePO4 with the ESP8266 programmed under Arduino. This fits into a 2-AA holder.
Pix: https://hackster.imgix.net/uploads/image/file/82321/20151013_140932.jpg?w=1280&h=960&fit=max&fm=jpg
Ray
Cool! What running time do you get?
@Johan,
I have had the ESP8266+0.96OLED display running for as long as 4 hours and still going strong; but I have never attempted to record the full life-span of the LiFePO4 cell … my specific need for this device is that it was built as a open WiFi “war walker” … walking around my neighborhood … most of my walks are under 60 minutes.
If you have not looked into LiFePO4 cells, they are simply great for hobby work. The chemistry never permits any elementary lithium production, so fire risks are low to non-existent.
Ray
Hi,
I was really impressed by this design, what with it being so small. However my concern is that ds18b20 sensors do not work below 3v. What is your plan for when your batteries start to go flat ? something tells me the battery life here that this can actually operate at is not very long because while the microcontroller will run well down to 1.8v, the sensors will not function properly below 3v, which kind of defeats the point.
What do you reckon?
Regards,
James
Hi James,
That is indeed a very good point I need to consider. Others seem to have had success with the ’20 below 3V. I’ll look into that one.
Regards,
Johan
Where can I buy the AAduino ?
Nowhere yet but the plan is to fix that.
This is an excellent idea! I’ve been working on a small FM radio for years to hear 72-76MHz transmissions, and one thing that’s kept me from making a bunch of them is the form factor. With this, I can stick the radio in the box and just drill a hole for the headphone jack and I’m in business! My design can fit on a 14.5x50mm board, so that should be just fine. Thanks for sharing!
Thanks! Would love to see your design.
Add my name to the list of folks interested in buying these when available.
Johan –
If you are pressed to put time into the development of these devices, let me suggest talking with the LowPowerLab people. They have solid experience putting together many small, similar boards.
see this link: http://lowpowerlab.com/moteino/
Good luck!
Thanks Stewart! I have one option I will explore this summer and will definitely check with LowPowerLab if that option does not work out.
Brilliant implementation! Well done. Would sign up to purchase a few of these, so add me to the list 🙂
Thanks!
Pingback: AAduino | Ciencia + Tecnoloxía
I would sign up to purchase a few of these as well. Please add me to the list 🙂
Put me down for a few of these. WOW!!!! Wish I could buy them now.
Pingback: توسعه یک برد Arduino clone به اندازه یک باتری قلمی - پولادین
Johan, I see you have updated the article to point at DirtyPCBs boards for the AAduino. (Not sure when that happened.) Thank you for that.
I am still hoping for a prebuilt device. Pretty sure I am not alone in that regard. From the Commadorable 64 comments, it appears you are still working out the details for prebuilt AAduinos. Is that correct?
Dag
Hi Dag. That happened a few days ago and yes, there is (low bandwidth) work ongoing for crowd funding the AAduino.
Hi Johan,
I found this amazing project and I want to buy.
One question: if I buy from DirtyPCBs AAduino I’ll receive AAduino mounted and ready for use?
Thanks a lot and very compliments to you
Hi Franco. Thanks! If you buy from DirtyPBCs you only get the PCBs but there is a plan as we speak to start a crowdfunding campaign for building lots and lots of AAduinos. Stay tuned 🙂
Hi,
what frequency version of the RFM69C have you used?
Hi Louis. I have used the 868MHz version.
868 MHz. OK.
And about the antenna, could you give me its characteristics, like total length of the wire, diameter of the spires, and tickness of the wire?
I am afraid I cannot. When not using a piece of wire cut to the right length I use scrap antennas from discarded 868MHz devices and have still to find a source of these.
Hello Johan, is this Packet radio you are doing, or LoRa?
Sorry for my stupid question, you are using RFM69, not RFM9x. Hence Packet radio.
🙂
Hello,
stumbled on this perfect mini node – do you know wether it will work with a RM95W instead of the RFM69C? Looking forward to be LoRa compatible…
Cheers
Caspar
Hi Caspar,
Looking at the pinout of the ’95W I see it’s not compatible with the ’69CW footprint. I have not dived into LoRa yet but will do a LoRa version when the day comes.
Cheers,
Johan
Hi Johan
Do you use a special programming adapter in order to burn the bootloader and sketch to the ATmega328?
I soldered wires with the SPI signals to the RFM-Pads
Best regards
Thomas
I used a TQFP32-DIP32 adapter from eBay to build a “breadboard Arduino” and flashed the boot loader onto the chips prior to mounting. From there I used the UART pins in the AAduino to flash the application.
That is a good and easy way to flash more than one chip 🙂
I am just working on an AAduino with iCSP and FTDI-Adapter. onboard.
This way I can solder an “empty” ATmega328 on the PCB. After soldering flashing bootloader and sketch to the atmega is pretty easy.
Could we use SPI to program it (without bootloader) as the chip is soldered onto the aaduino PCB?
That should work. @Thomas has more experience than me with this.
I think this could be part of a future enhancement of this project : exposing the SPI pins in raw on the PCB
@LM Croisez
yes, just connect the SPI-Pins and Reset to a 2×3 Pin Male Header. Then you have an ICSP Interface.
Now you can connect an AVR Programming Adapter to the AAduino and flash the ATmega328.
An ICSP Connector would be a very useful enhancement for a future AAduino PCB Version.
Thomas (aka Arduinopraxis)
do i need the oscillator to program the microcontroler by icsp ?
I would think so but have never tried without it.
@Louis Croisez
Basically you can flash an Arduino Board with ATmega328 over ICSP with no external oscillator.
You only need to choose an 8MHz Board in your Arduino IDE. By default 8MHz Arduino is not included in the IDE.
For low power applications an 8MHz Arduino (with internal oscillator) is an ideal solution.
Details on 8 MHz Arduino
https://www.arduino.cc/en/Tutorial/ArduinoToBreadboard
Oh, that reminds me. My first Arduino design ran on the internal oscillator. It screwed up the UART baud rate slightly so TX failed. 115200 baud ended up around 117000 IIRC. I added the external oscillator and all was well.
Pingback: The AAduino Zero – Johan Kanflo